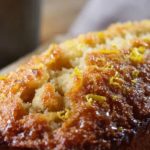
Nigella Dorset Apple Cake is one of those quiet classics that wins you over with the first slice. It is dense yet tender, packed with soft apple pieces, scented with cinnamon and lemon, and it takes 20 minutes to prep, 55 minutes to cook, and 75 minutes in total.
I like making this when I want a simple British-style apple cake that feels a little rustic but still polished enough for guests. This version uses all-purpose flour, butter, eggs, apples, and a gentle stovetop method, and I’d call it intermediate rather than beginner because stovetop heat control matters more than you might think. Too much heat and the base can catch before the centre sets; too much mixing and the crumb loses its softness.
What Exactly Is Nigella Dorset Apple Cake?
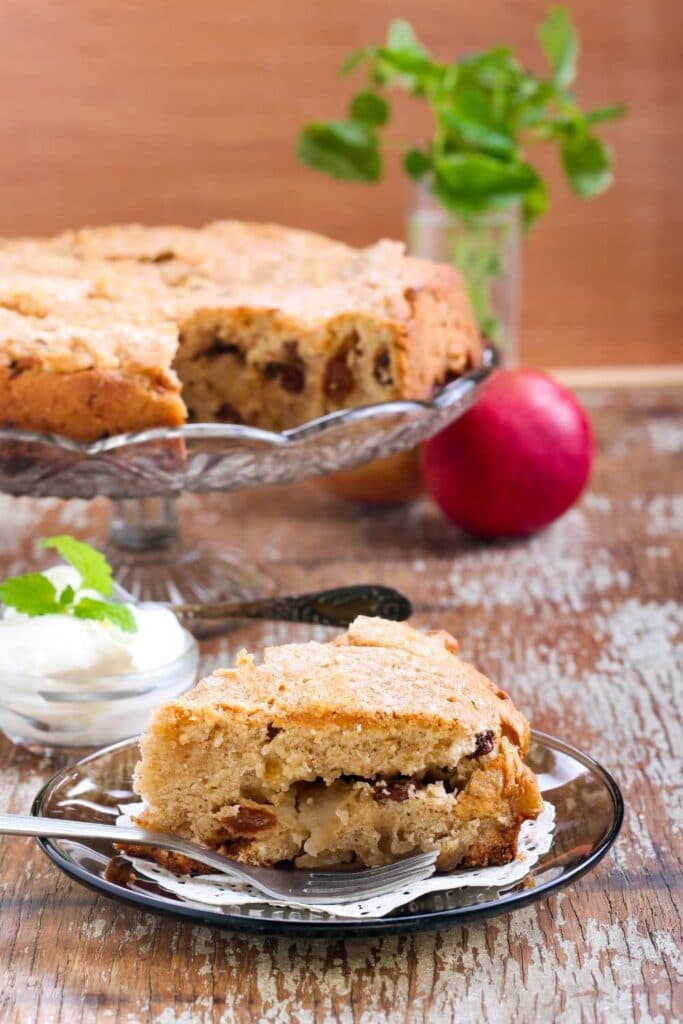
Nigella Dorset Apple Cake is a homely apple cake in the British tradition, built around chunks of tart-sweet apples suspended in a rich buttery batter. It is not fluffy like a sponge and not wet like a pudding; it sits somewhere in the middle, like a sturdy wool coat that still feels soft.
What makes it stand out is the balance. Lemon keeps the apples bright, cinnamon adds warmth without shouting, and the sugar on top gives a delicate crust while the inside stays moist from the fruit and the slow stovetop baking.
Key Ingredients Needed for Nigella Dorset Apple Cake
- Apples — 2 medium tart-sweet apples, such as Braeburn or Honeycrisp, bring moisture, texture, and the main flavour of the cake.
- Fresh lemon juice — 1 tbsp stops the diced apples from discolouring and adds brightness to the finished flavour.
- All-purpose flour — 1 cup plus 2 tbsp gives the cake its structure and helps support the weight of the fruit.
- Baking powder — 1 tsp provides the gentle lift this stovetop cake needs.
- Ground cinnamon — 1/2 tsp adds warm spice without overpowering the apples.
- Fine sea salt — 1/4 tsp sharpens the sweetness and rounds out the buttery crumb.
- Unsalted butter — 8 tbsp, softened, creates richness and helps the cake stay tender.
- Granulated sugar — 1/2 cup sweetens the batter and helps with the light creaming step.
- Eggs — 2 large eggs, at room temperature, add structure, richness, and a smoother batter.
- Vanilla extract — 1 tsp gives the cake a softer, fuller flavour in the background.
- Whole milk — 2 tbsp loosens the batter just enough so it stays soft and creamy.
- Topping sugar — 1 tbsp granulated sugar sprinkled over the top creates a delicate crust as the cake cooks.
Equipment
- Mixing bowls — You need one medium bowl for the dry ingredients and another for creaming the butter and sugar.
- Hand mixer — This helps beat the butter and sugar for 3 to 4 minutes until pale and fluffy.
- Spatula — A rubber spatula is useful for scraping the bowl and folding the flour and apples in gently.
- 7-inch heavy skillet or deep stovetop-safe cake pan — This is the key pan for the stovetop method and needs to hold steady, low heat.
- Lid and clean kitchen towel — The towel wrapped under the lid catches condensation so the top does not turn sticky.
- Skewer — You will use this to check the centre for wet batter near the end of cooking.
Instructions to Make Nigella Dorset Apple Cake
- Prep the apples — Toss the 1/2-inch diced apples with the 1 tbsp fresh lemon juice and set aside. This prevents browning and keeps the flavour bright rather than dull.
- Whisk the dry ingredients — In a medium bowl, whisk together 1 cup plus 2 tbsp all-purpose flour, 1 tsp baking powder, 1/2 tsp ground cinnamon, and 1/4 tsp fine sea salt for 30 seconds. That quick whisk helps the cake rise evenly and stops pockets of baking powder.
- Cream butter and sugar — In a separate bowl, beat the 8 tbsp softened unsalted butter and 1/2 cup granulated sugar with a hand mixer for 3 to 4 minutes until pale and fluffy. Scrape down the bowl once or twice because trapped air matters even more when this Cake is cooked on the stovetop.
- Add the eggs gradually — Beat in the 2 large eggs one at a time, mixing well after each addition until glossy. If the mixture looks slightly curdled, leave it alone and keep going; adding both eggs at once is what really causes trouble.
- Mix in vanilla and milk — Beat in the 1 tsp vanilla extract and 2 tbsp whole milk just until combined. The batter should look soft and creamy, not loose, or the apples may sink too much.
- Fold in the flour mixture — Add the dry ingredients in two additions and fold with a spatula just until no dry streaks remain. Overmixing is the enemy here because it builds gluten and turns a tender crumb into something heavy.
- Stir through the apples — Fold in the lemon-tossed apples evenly, making sure the fruit reaches all the way to the bottom of the bowl. The batter will be thick and full of apple pieces, and that is exactly right.
- Prepare the pan — Grease a 7-inch heavy skillet or deep stovetop-safe cake pan and line the base with a round of parchment paper if possible. Spoon in the batter, level the top, and sprinkle over the remaining 1 tbsp granulated sugar for a light crust.
- Cook on very low heat — Set the pan over very low heat on the smallest burner, ideally on a heat diffuser, and cover tightly with a lid wrapped underneath with a clean kitchen towel. Cook for 45 to 55 minutes, checking after 35 minutes; the cake is ready when the top looks dry, the edges pull lightly from the pan, and a skewer comes out without wet batter.
- Rotate if needed — Turn the pan a quarter turn every 15 minutes if your burner has a hot spot, and keep the heat low enough that you hear no aggressive sizzling. If the bottom colours too quickly or smells deeply caramelised before the centre sets, lower the heat or briefly lift the pan off the burner.
- Rest before unmoulding — Take the pan off the heat and leave the cake uncovered for 10 minutes. This helps the crumb firm up and stops trapped steam from making the top sticky.
- Unmould and cool — Run a thin spatula around the edge, invert carefully, peel off the parchment if used, and turn the cake right side up. Cool until warm or room temperature before slicing, or bake the same batter in a greased 7-inch cake pan at 350°F / 177°C for 35 to 40 minutes if you want the oven option.

Common Mistakes I Made (And How I Fixed Each One)
- The batter got tough — That happened when I mixed too long after adding the flour. Now I fold just until the dry streaks disappear, and the crumb stays tender.
- Overheating the pan — A stronger flame browned the bottom too quickly, while the middle stayed underdone. Very low heat is the answer, and rotating the pan every 15 minutes helps even things out.
- Skipping the towel-wrapped lid — Without that barrier, condensation dripped back onto the cake and made the top sticky. A clean kitchen towel catches the moisture and keeps the surface drier.
- Adding both eggs at once — The mixture lost volume and looked less stable. Beating in one egg at a time keeps the batter glossy and better aerated.
- Cutting it too soon — Fresh off the heat, the cake is still settling and can break apart when turned out. A 10-minute rest makes Nigella Dorset Apple Cake much easier to unmould cleanly.
- Uneven apple distribution — Once, I did not fold all the way to the bottom of the bowl, and one slice had hardly any fruit. Now I give the batter a few broad strokes from bottom to top before it goes into the pan.
Healthier Version of Nigella Dorset Apple Cake
- Whole-grain swap — Replace 1/2 cup of the all-purpose flour with 1/2 cup wholemeal flour for a nuttier crumb and a little more fibre. Keep the remaining 1/2 cup plus 2 tbsp as all-purpose flour so the cake does not turn too dense.
- Reduced sugar — Use 1/3 cup granulated sugar in the batter instead of 1/2 cup if your apples are naturally sweet. You can still keep the 1 tbsp topping sugar for that thin crust.
- Lighter dairy — Swap the 8 tbsp unsalted butter for 6 tbsp unsalted butter and keep the 2 tbsp whole milk the same. The cake will be slightly less rich but still tender.
- Extra fruit — Increase the apples from 2 medium to 3 small apples if they are still cut into 1/2-inch dice. More fruit means more moisture and natural sweetness, though the batter will feel even chunkier.
- Smaller portions — Slice the finished cake into 6 pieces instead of 4 if you want a lighter serving. That is often the simplest adjustment, and it changes nothing about the method.
What to Pair With Nigella Dorset Apple Cake
- Warm tea — A plain black tea or Earl Grey works beautifully with the buttery crumb and apple sweetness. It cuts through the richness without fighting the cinnamon.
- Cold cream — A spoonful served on the side makes this feel closer to dessert than cake. The contrast between cool cream and warm Nigella Dorset Apple Cake is hard to resist.
- Vanilla ice cream — This is a classic pairing for a reason. As it melts into the apple pieces, the whole thing feels a bit like a shortcut between cake and pie.
- Greek yogurt — For breakfast or a lighter pudding, a dollop of thick yogurt adds tang and freshness. It also echoes the bright edge from the lemon juice.
- Cheddar — If you like the sweet-savoury British habit, a small slice of sharp cheddar beside the cake is surprisingly good. Apples and cheese have always made sense together, have they not?
Pro Tips to Get Perfect Nigella Dorset Apple Cake Every Time
- Room-temperature eggs — They blend into the creamed butter more smoothly, which helps the batter stay glossy and stable. Cold eggs can make the mixture look split and harder to manage.
- Proper creaming — Beat the butter and sugar for the full 3 to 4 minutes because this is where you build air. On the stovetop, that little bit of trapped air matters more than you might expect.
- Gentle folding — Use broad strokes when adding the flour so you do not knock out too much air or develop too much gluten. A heavy hand makes a rustic cake feel oddly rigid.
- Smallest burner — Nigella Dorset Apple Cake needs patience, not power. The smallest burner on very low heat gives the centre time to cook before the base darkens too much.
- Heat diffuser help — If you have one, use it. It softens direct heat and gives you a more forgiving cooking environment.
- Visual checks — Listen for quiet cooking rather than sizzling, and look for a dry top and edges pulling slightly away from the pan. Those signs tell you more than the clock alone.
- Cooling discipline — Let the cake rest uncovered for 10 minutes before unmoulding. That short pause protects the texture and makes the top less sticky from trapped steam.
Easy Variations of Nigella Dorset Apple Cake
- Nutty finish — Add 2 tbsp chopped walnuts to the batter when you fold in the apples. They bring crunch without changing the core character of the cake.
- Extra spice — Use 1/4 tsp ground nutmeg alongside the 1/2 tsp ground cinnamon for a warmer flavour. Keep it modest so the apples still lead.
- Citrus twist — Stir in 1 tsp finely grated lemon zest with the vanilla extract for a brighter aroma. It sharpens the whole profile in a clean, fresh way.
- Pear version — Replace 1 of the 2 apples with 1 medium firm pear, peeled and diced to the same 1/2-inch size. The texture turns a touch softer and sweeter.
- Brown sugar topping — Swap the 1 tbsp granulated sugar on top for 1 tbsp light brown sugar. The crust will be slightly deeper in flavour and more caramel-like.
- Almond note — Replace the 1 tsp vanilla extract with 1/2 tsp vanilla extract and 1/2 tsp almond extract if you want a bakery-style background note. Use a light hand because almond can take over quickly.
How to Store Nigella Dorset Apple Cake the Right Way
- Room temperature — Store the cooled cake tightly wrapped or in an airtight container for up to 2 days. Make sure it is fully cool first, so trapped steam does not soften the crust.
- Refrigerator option — Keep it in an airtight container in the fridge for up to 5 days. I like placing parchment between slices if I have already cut it.
- Freezer method — Freeze individual slices or the whole cake, well wrapped, for up to 2 months. A layer of cling film followed by foil or a freezer-safe container works well.
- Thawing approach — Defrost overnight in the refrigerator or leave it at room temperature for several hours. Slow thawing helps the crumb stay soft rather than damp.
- Portion planning — If you know you will reheat only one slice at a time, freeze pieces separately. That way, you do not need to thaw the entire Nigella Dorset Apple Cake just for a small serving.
The Best Ways to Reheat Nigella Dorset Apple Cake
- Oven method — Reheat slices in a 300°F / 149°C oven for 8 to 10 minutes. This is my favourite option because it warms the centre gently and softens the crumb without drying it out.
- Stovetop method — Warm slices gently in a covered skillet over low heat for 3 to 4 minutes. Keep the heat soft so the cake warms through without scorching on the base.
- Microwave shortcut — For one slice, use an 800-watt microwave in 10-second bursts for 20 to 30 seconds total. Cover it loosely so the cake does not dry out, but do not overdo it or the texture can turn rubbery.
- Air fryer option — Heat a slice at 300°F / 149°C for 3 to 4 minutes, checking early. It works well for a lightly refreshed exterior, though it is easier to overcook than the oven.
Nutrition (Per Serving)
Based on 1 serving = 1 slice out of 4 total servings. These values are approximate, and the recipe data gives the exact listed figures for the main nutrients.
- Calories — about 462 per serving.
- Protein — about 6.3g per serving.
- Fat — about 21.8g per serving.
- Saturated Fat — around 12.9g per serving.
- Carbohydrates — about 62.7g per serving.
- Fiber — about 3.3g per serving.
- Sugar — about 34.8g per serving.
- Sodium — around 278mg per serving.
- Cholesterol — about 122mg per serving.
Try Other Nigella Chocolate Cake Recipes
- Nigella Chocolate Gingerbread Cake
- Nigella Italian Apple Cake
- Nigella Banana Chocolate Cake
- Nigella Lemon Curd Cake
- Nigella Nutella Cake
- Nigella Passionfruit Ice Cream Cake
FAQs
Can I bake Nigella Dorset Apple Cake in the oven instead?
Yes. Bake the same batter in a greased 7-inch cake pan at 350°F / 177°C for 35 to 40 minutes, until a skewer inserted in the centre comes out clean.
Which apples work best for Nigella’s Dorset Apple Cake?
Tart-sweet apples like Braeburn or Honeycrisp are ideal because they hold their shape and give balanced flavour. Very soft apples can disappear too much into the crumb.
Why is my cake browned underneath but still wet in the middle?
The heat was likely too high, which is the main risk with the stovetop method. Use very low heat, the smallest burner, and rotate the pan every 15 minutes if needed.
Do I really need to line the pan with parchment?
If possible, yes, especially for easier unmoulding. The cake can still be made without it, but parchment gives you a bit more insurance.
Can I make Nigella Dorset Apple Cake ahead of time?
Absolutely. It keeps well at room temperature for up to 2 days or in the fridge for up to 5 days, and the flavour often settles nicely by the next day.
How do I know when the cake is done without overcooking it?
Look for a dry-looking top, edges pulling lightly from the pan, and a skewer that comes out without wet batter. Those signs matter more than checking too early and lifting the lid over and over.
Final Thoughts
Nigella Dorset Apple Cake is simple in spirit, but it rewards care, especially with the gentle stovetop cooking. If you like cakes with real texture, clear apple flavour, and that cosy butter-cinnamon warmth, this one is well worth making.
Try it once, trust the low heat, and you will see why I keep coming back to it. A modest cake, yes, but sometimes the quiet ones are the best on the table.
PrintNigella Dorset Apple Cake
This classic British-style apple cake is dense yet tender, with a buttery crumb and plenty of soft apple pieces suspended throughout. Warm cinnamon and lemon brighten the flavor, while a gentle stovetop baking method creates a moist interior and lightly golden crust.
- Prep Time: 20
- Cook Time: 55
- Total Time: 75
- Yield: 4 1x
- Category: Main Course
- Method: Stovetop
- Cuisine: International
Ingredients
- 2 medium tart-sweet apples, such as Braeburn or Honeycrisp, peeled, cored, and cut into 1/2-inch dice
- 1 tbsp fresh lemon juice
- 1 cup plus 2 tbsp all-purpose flour
- 1 tsp baking powder
- 1/2 tsp ground cinnamon
- 1/4 tsp fine sea salt
- 8 tbsp unsalted butter, softened
- 1/2 cup granulated sugar
- 2 large eggs, room temperature
- 1 tsp vanilla extract
- 2 tbsp whole milk
- 1 tbsp granulated sugar, for topping
Instructions
- Prepare the apples first so they are ready to fold in as soon as the batter is mixed. Toss the diced apples with the lemon juice in a bowl and set aside; this prevents discoloration and adds a slight brightness that keeps the cake from tasting flat.
- In a medium bowl, whisk together the flour, baking powder, cinnamon, and fine sea salt for 30 seconds. Distributing the leavening and spice evenly at this stage helps the cake rise uniformly and prevents pockets of baking powder in the finished crumb.
- In a separate mixing bowl, beat the softened butter and 1/2 cup granulated sugar with a hand mixer for 3 to 4 minutes until pale and fluffy. Scrape down the bowl once or twice with a rubber spatula; properly creamed butter traps air, which is especially important in a cake cooked on the stovetop where oven spring is gentler.
- Add the eggs one at a time, beating well after each addition until fully incorporated and glossy. If the mixture looks slightly curdled, do not panic; it will smooth out once the flour is added, but avoid adding both eggs at once or the batter can lose volume.
- Beat in the vanilla extract and whole milk just until combined. The batter should look soft and creamy, not loose, which ensures it can support the weight of the apples without sinking excessively.
- Fold the dry ingredients into the butter mixture with a spatula in two additions, mixing just until no dry streaks remain. Overmixing at this point will develop gluten and make the cake tough rather than tender, so use broad, gentle strokes and stop as soon as the flour disappears.
- Fold in the lemon-tossed apples evenly, making sure the fruit is well distributed all the way to the bottom of the bowl. The batter will be thick and heavily studded with apple, which is correct for this style of rustic cake.
- Grease a 7-inch heavy skillet or deep stovetop-safe cake pan and line the base with a round of parchment paper if possible. Spoon in the batter, level the top with an offset spatula or the back of a spoon, and sprinkle the remaining 1 tbsp granulated sugar evenly over the surface for a delicate crust.
- Set the pan over very low heat on the smallest burner, ideally on a heat diffuser, and cover tightly with a lid wrapped underneath with a clean kitchen towel to catch condensation. Cook for 45 to 55 minutes, checking after 35 minutes; the cake is ready when the top looks dry, the edges have lightly pulled from the pan, and a skewer inserted in the center comes out without wet batter.
- Rotate the pan a quarter turn every 15 minutes if your burner has a hot spot, keeping the heat low enough that you hear no aggressive sizzling from the base. If the bottom begins to color too quickly or smells deeply caramelized before the center sets, lower the heat further or briefly lift the pan off the burner to moderate it.
- Once cooked, remove the pan from the heat and let the cake rest uncovered for 10 minutes. This short rest allows the crumb to firm up so it unmolds cleanly and prevents steam from making the top sticky.
- Run a thin spatula around the edge, invert carefully, peel off the parchment if used, and turn the cake right side up to cool until warm or room temperature before slicing. For an oven alternative, bake the same batter in a greased 7-inch cake pan at 350°F / 177°C for 35 to 40 minutes, until a skewer inserted in the center comes out clean.
Notes
Store the cooled cake tightly wrapped or in an airtight container at room temperature for up to 2 days, or refrigerate for up to 5 days. Freeze individual slices or the whole cake, well wrapped, for up to 2 months; thaw overnight in the refrigerator or at room temperature for several hours. Reheat slices in a 300°F / 149°C oven for 8 to 10 minutes, or warm gently in a covered skillet over low heat for 3 to 4 minutes so the crumb softens without scorching.
Nutrition
- Calories: 462
- Sugar: 34.8g
- Sodium: 278mg
- Unsaturated Fat: 13.1g
- Carbohydrates: 62.7g
- Fiber: 3.3g
- Protein: 6.3g
- Cholesterol: 145mg