Nigella Lemon Curd Cake is the sort of cake I make when I want something sunny, soft, and just sharp enough to keep every bite interesting. It has a buttery sponge, bright lemon zest, fresh lemon juice, and a glossy layer of lemon curd, all cooked with a gentle stovetop method in 70 minutes from start to finish.
This recipe suits a small gathering, a weekend treat, or a simple dessert when you want something that feels polished without being fussy. It sits in that sweet spot between beginner and intermediate: the ingredients are straightforward, but stovetop heat control, gentle mixing, and cooling before filling all matter if you want the crumb to stay tender and the curd to sit neatly.
What Exactly Is Nigella Lemon Curd Cake?
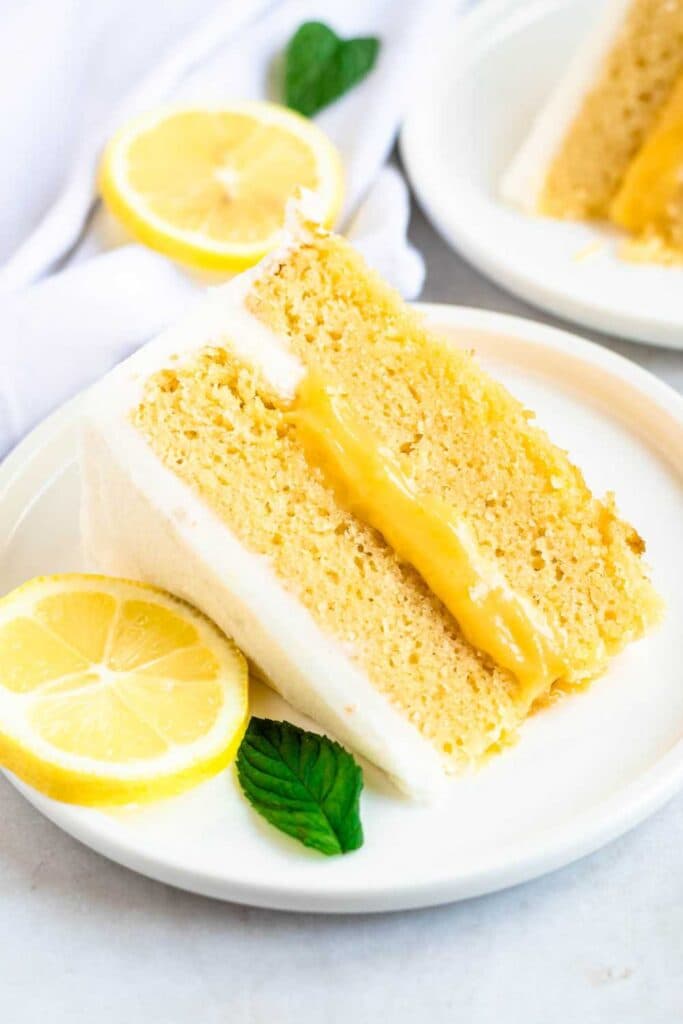
Nigella Lemon Curd Cake is a tender sponge cake layered and topped with lemon curd, giving you a mix of buttery sweetness and lively citrus in the same forkful. Think of it as a soft little cloud with a streak of sunshine running through it.
What makes this version stand out is the cooking method. Instead of relying on the oven, the cake cooks in a covered, heavy-bottomed pan over very low heat, which keeps the crumb moist and delicate when handled carefully.
Why This Recipe Is a Must-Try
- Bright flavor — The combination of lemon zest, fresh lemon juice, and prepared lemon curd gives Nigella Lemon Curd Cake a clean citrus edge that cuts through the butter and sugar beautifully.
- Gentle texture — Cooking the sponge in a covered pan over very low heat creates a soft, moist crumb that feels almost like velvet if you avoid overmixing.
- Small batch — With 4 servings, this cake is ideal when you want something special without ending up with leftovers crowding the fridge for days.
- Flexible method — The main recipe uses the stovetop, but there is also an oven option at 350°F / 177°C for 25 to 30 minutes if that suits your kitchen better.
- Neat presentation — A layer of curd inside and a glossy layer on top makes this cake look elegant, even though the ingredient list is short and familiar.
- Balanced sweetness — Some cakes feel heavy by the second slice, don’t they? This one stays fresh-tasting because the lemon curd brings a tangy finish that keeps things lively.
Key Ingredients Needed for Nigella Lemon Curd Cake
- All-purpose flour — This forms the structure of the cake and gives the sponge enough body to hold the lemon curd layers.
- Baking powder — A small amount helps the cake rise evenly, which matters even more in a stovetop cake.
- Fine sea salt — Salt sharpens the lemon flavor and keeps the sweetness from tasting flat.
- Unsalted butter — Softened butter creates richness in the batter, while 1 teaspoon is used to grease the pan.
- Granulated sugar — Sugar sweetens the sponge and helps the butter cream into a light, fluffy base.
- Large eggs — Room temperature eggs help the batter emulsify properly and support a tender crumb.
- Lemon zest — Finely grated zest gives the cake a fragrant citrus note without extra liquid.
- Fresh lemon juice — This adds sharpness and fresh lemon flavor directly into the sponge.
- Whole milk — Room temperature milk loosens the batter slightly and helps keep the texture soft.
- Prepared lemon curd — The curd is the glossy filling and topping that makes Nigella Lemon Curd Cake unmistakably lemony.
- Confectioners’ sugar — A light sifted finish adds a delicate final touch just before serving.
Equipment
- Heavy-bottomed 8-inch skillet or stovetop-safe cake pan — This is essential for steady, gentle cooking and helps prevent the base from scorching.
- Tight-fitting lid — Trapped steam helps the cake cook through evenly without drying out.
- Medium mixing bowl — You will need this for whisking together the flour, baking powder, and salt.
- Hand mixer — This makes it much easier to cream the butter and sugar for the full 3 to 4 minutes.
- Spatula — A spatula is best for folding in the flour mixture without knocking out too much air.
- Long serrated knife — Use this to split the cooled cake into 2 even layers without tearing the crumb.
Instructions to Make Nigella Lemon Curd Cake
- Prepare the pan — Grease the base and sides of a deep 8-inch heavy-bottomed skillet or stovetop-safe cake pan with the 1 teaspoon butter, line the base with a round of parchment, and keep a tight-fitting lid ready. The trapped steam matters here; without it, the cake can dry out before the center cooks through, though you can bake the same batter at 350°F / 177°C for 25 to 30 minutes if preferred.
- Whisk the dry ingredients — In a medium bowl, whisk together the flour, baking powder, and fine sea salt for 30 seconds. This small step prevents dense patches and bitterness from uneven baking powder pockets.
- Cream butter and sugar — In a separate bowl, beat the softened butter and granulated sugar with a hand mixer for 3 to 4 minutes until pale, light, and fluffy, scraping the bowl once or twice. This is where the sponge gets much of its lift, so stop too early and the cake may turn heavy.
- Add eggs and lemon — Beat in the eggs one at a time, mixing well after each addition until fully emulsified; if the mixture looks slightly curdled, add 1 tablespoon of the flour mixture and keep beating. Mix in the lemon zest and lemon juice until just combined.
- Fold in flour and milk — Fold in half of the flour mixture with a spatula, add the milk, then fold in the remaining flour mixture until no dry streaks remain. Overmixing at this stage can toughen the crumb, so treat the batter gently.
- Fill the pan — Spoon the batter into the prepared pan, level the top with a small offset spatula or the back of a spoon, and tap the pan once or twice on the counter to release large air pockets. Don’t keep tapping, though, because too much can knock out the air you just worked in.
- Start stovetop cooking — Place the pan over very low heat, ideally on a heat diffuser if you have one, and cover tightly with the lid. Low and slow is the whole point; too much heat can set the bottom too fast and leave the middle lagging behind.
- Cook covered — Cook for 30 to 35 minutes over very low heat, resisting the urge to lift the lid for the first 20 minutes. You want a domed top that looks dry and a cake that is just beginning to pull slightly from the sides.
- Check for doneness — Insert a thin skewer into the center; it should come out clean or with a few moist crumbs, but no wet batter. If needed, cook for 3 to 5 minutes more on low heat, rotating the pan halfway through the final cooking time if your burner heats unevenly.
- Rest and cool briefly — Remove the pan from the heat and let the cake rest, covered, for 5 minutes so residual heat finishes setting the center, then uncover and cool in the pan for another 10 minutes. Run a thin knife around the edge before unmolding to help prevent tearing.
- Cool completely — Turn the cake out onto a rack, peel off the parchment, and let it cool completely before filling. A warm sponge will melt the lemon curd and make the layers slip like wet cards, so patience pays off here.
- Fill and finish — Slice the cake horizontally into 2 even layers, spread 1/3 cup of the lemon curd over the bottom layer, stopping 1/4 inch from the edge, replace the top layer, and spread the remaining lemon curd over the surface. Sift over the confectioners’ sugar just before serving, then let the assembled cake stand for 10 minutes so the curd settles cleanly.
Common Mistakes I Made (And How I Fixed Each One)
- The batter got heavy — I learned that under-creaming the butter and sugar makes Nigella Lemon Curd Cake denser than it should be. Beating for the full 3 to 4 minutes makes a real difference.
- Overmixing toughened the crumb — Once the flour goes in, too much stirring turns the sponge from tender to tight. Now I fold only until the dry streaks disappear.
- Skipping the lid caused uneven cooking — Without a tight cover, the top stayed pale, and the center took longer to set. The lid traps steam and acts like a gentle little oven on the hob.
- Too much heat scorched the base — A stronger flame sounds tempting when the cake seems slow, but it backfires fast. Very low heat, and a diffuser if you have one, keeps the bottom from catching.
- Cutting while warm made a mess — Lemon curd on warm cake slides around and seeps out at the edges. Cooling completely before slicing and filling keeps the layers tidy.
- Checking too early flattened the rise — Lifting the lid before the first 20 minutes lets the trapped heat escape. Now I leave it alone and let the cake build structure before peeking.
Healthier Version of Nigella Lemon Curd Cake
- First, reduce the sugar — Use 6 tbsp granulated sugar instead of 1/2 cup for a less sweet sponge. The cake will still work, though the crumb may be slightly less soft.
- Another swap is the butter — Try 6 tbsp unsalted butter instead of 8 tbsp to trim some richness. The texture stays good, but the cake may feel a little less plush.
- For lighter dairy — Replace the 2 tbsp whole milk with 2 tbsp semi-skimmed milk. It is a small change, yet it keeps the batter close to the original consistency.
- If you want less topping — Use 1/3 cup prepared lemon curd total instead of 1/2 cup, spreading a thinner layer inside and over the top. That keeps the citrus note while lowering overall sugar.
- Even the finish can be trimmed — Dust with 1 tsp confectioners’ sugar instead of 1 tbsp for a lighter final touch. You still get the neat look, just with less sweetness.
What to Pair With Nigella Lemon Curd Cake
- Fresh berries — A handful of raspberries or strawberries next to a slice works beautifully because their tartness mirrors the lemon without stealing the show.
- Hot tea — Earl Grey or a simple black tea pairs well with Nigella Lemon Curd Cake, especially if you like that citrus-on-citrus effect.
- Soft cream — A spoonful of lightly whipped cream tones down the tang and adds a mellow contrast to the glossy curd.
- Plain yogurt — Unsweetened Greek yogurt brings a cool, clean sharpness that makes the cake feel less rich and more balanced.
- Vanilla ice cream — Cold vanilla against the bright lemon topping is a classic contrast, like silk meeting satin.
- Mint leaves — A few fresh leaves add a clean finish and make the plate look a little smarter with almost no effort.
Pro Tips to Get Perfect Nigella Lemon Curd Cake Every Time
- Room-temperature ingredients matter — Softened butter, room temperature eggs, and room temperature milk blend more smoothly, which helps the batter emulsify instead of splitting.
- A proper whisk saves trouble — Whisking the dry ingredients for 30 seconds spreads the baking powder evenly, so you avoid bitter spots and patchy rise.
- Gentle folding protects texture — Once flour is added, fold rather than beat because the sponge stays lighter and more tender.
- Very low heat is essential — Stovetop cake is not the place to rush; a stronger flame can scorch the bottom before the center is done.
- Resisting the lid is smart — Keeping the pan covered for the first 20 minutes helps trap steam and supports an even rise.
- Complete cooling prevents slipping — Cool cake holds the lemon curd neatly, while a warm cake turns the filling loose and messy.
- Clean knife cuts look better — Wiping the knife between slices keeps the curd from dragging and gives you sharper, prettier portions.
Easy Variations of Nigella Lemon Curd Cake
- Berry-topped version — Finish the assembled cake with 1/4 cup fresh raspberries or blueberries over the lemon curd for extra color and a sharper fruit note.
- Orange twist — Swap the 1 tsp lemon zest for 1 tsp orange zest and replace the 2 tbsp fresh lemon juice with 2 tbsp fresh orange juice for a softer citrus profile.
- Lime change — Use 1 tsp lime zest in place of the lemon zest and 2 tbsp fresh lime juice instead of lemon juice if you want a brighter, slightly punchier finish.
- Extra-curd finish — Spread an additional 1 tbsp prepared lemon curd on top just before serving if you like a glossier, more assertive citrus layer.
- Softer sugar dusting — Increase the confectioners’ sugar from 1 tbsp to 2 tbsp for a snowier top and a sweeter first bite.
- Oven-baked option — Make the same batter in a greased 8-inch pan and bake at 350°F / 177°C for 25 to 30 minutes if you prefer not to use the stovetop method.
How to Store Nigella Lemon Curd Cake the Right Way
- Because of the curd — Store the assembled cake covered in the refrigerator for up to 4 days. A cake carrier or an airtight container works best to stop the top from drying out.
- Before serving again — Let refrigerated slices stand at room temperature for 20 to 30 minutes for the best texture. Cold sponge can taste firmer and less buttery.
- For longer storage — Freeze unfilled cake layers, well wrapped, for up to 2 months. I like to wrap each layer tightly before placing it in a freezer-safe container or bag.
- Overnight thawing helps — Thaw frozen unfilled layers overnight in the refrigerator before filling. That slow thaw keeps condensation and sogginess to a minimum.
- Keep the top protected — If the cake is already filled, press the cover high enough so it does not smear the lemon curd. A little space saves the finish.
The Best Ways to Reheat Nigella Lemon Curd Cake
- Oven for unfilled slices — Reheating is not recommended once filled, but unfilled slices can be warmed in a 300°F / 149°C oven for 6 to 8 minutes. This is the best method if you want the crumb gently softened without drying it out.
- Microwave with care — For an unfilled slice, warm on a microwave-safe plate at 700-800 watts for 10 to 15 seconds. Any longer and the cake can turn rubbery, so keep it brief.
- Air fryer works quickly — An unfilled slice can be warmed at 300°F / 149°C for 2 to 3 minutes in the basket. Check early because circulating heat can dry the edges faster than an oven.
- Stovetop is the last option — Place an unfilled slice in a covered pan over very low heat for 1 to 2 minutes, just until softened. I avoid this for a filled cake because the lemon curd can loosen too much.
Nutrition (Per Serving)
Based on 1 serving = 1 slice out of 4 total servings.
- Calories — about 472 per serving.
- Protein — about 6.9g per serving.
- Fat — about 21.8g per serving.
- Saturated fat — around 12.8g per serving.
- Carbohydrates — about 64.3g per serving.
- Fiber — about 0.9g per serving.
- Sugar — about 39.8g per serving.
- Sodium — about 222mg per serving.
- Cholesterol — around 145mg per serving.
FAQs
Can I bake Nigella Lemon Curd Cake in the oven instead?
Yes, you can bake the same batter in a greased 8-inch pan at 350°F / 177°C for 25 to 30 minutes. It is a handy backup if stovetop heat feels tricky.
Why does the recipe say not to lift the lid early?
The covered pan traps heat and steam, which helps the cake rise and cook evenly. Lift the lid too soon, and the center can struggle to set properly.
Can I make Nigella Lemon Curd Cake ahead of time?
Yes, you can make it ahead and store it covered in the refrigerator for up to 4 days once filled. For the best texture, let slices stand at room temperature for 20 to 30 minutes before serving.
What if my batter looks slightly curdled after adding the eggs?
Add 1 tablespoon of the flour mixture and continue beating. That usually brings the batter back together and keeps the texture smooth.
Can I freeze the finished cake?
The notes recommend freezing unfilled cake layers, well wrapped, for up to 2 months. I would avoid freezing the fully assembled cake because the lemon curd topping is more delicate.
How do I know the stovetop cake is done?
The top should look dry, slightly domed, and just begin pulling from the sides. A thin skewer inserted into the center should come out clean or with a few moist crumbs, but never wet batter.
Final Thoughts
Nigella Lemon Curd Cake is one of those small cakes that feels bigger than it is, thanks to that bright curd and soft sponge. If you keep the heat low and let the cake cool properly, it rewards you with slices that look neat and taste fresh.
If you try it, make it your own pace and trust the method. A calm hand and a little patience are the secret ingredients here.
Try Other Nigella Chocolate Cake Recipes
- Nigella Chocolate Gingerbread Cake
- Nigella Italian Apple Cake
- Nigella Banana Chocolate Cake
- Nigella Nutella Cake
- Nigella Passionfruit Ice Cream Cake
- Nigella Dorset Apple Cake
Nigella Lemon Curd Cake

This stovetop lemon curd cake is a tender, buttery sponge layered and finished with bright lemon curd for a rich but lively citrus flavor. Cooking the cake gently in a covered pan keeps the crumb soft and moist, while the curd adds a glossy, tangy finish that balances the sweetness.
- Prep Time: 25
- Cook Time: 45
- Total Time: 70
- Yield: 4 1x
- Category: Main Course
- Method: Stovetop
- Cuisine: International
Ingredients
- 1 cup all-purpose flour
- 1 tsp baking powder
- 1/4 tsp fine sea salt
- 8 tbsp unsalted butter, softened, plus 1 tsp for greasing the pan
- 1/2 cup granulated sugar
- 2 large eggs, room temperature
- 1 tsp lemon zest, finely grated
- 2 tbsp fresh lemon juice
- 2 tbsp whole milk, room temperature
- 1/2 cup prepared lemon curd
- 1 tbsp confectioners’ sugar, for finishing
Instructions
- Prepare a deep 8-inch heavy-bottomed skillet or stovetop-safe cake pan by greasing the base and sides with the 1 teaspoon butter, then line the base with a round of parchment. Set a tight-fitting lid aside; trapped steam helps the cake cook through gently without drying. If you prefer, an oven alternative is to bake the same batter in a greased 8-inch pan at 350°F / 177°C for 25 to 30 minutes.
- In a medium bowl, whisk together the flour, baking powder, and fine sea salt for 30 seconds to distribute the leavening evenly. This prevents dense patches and helps the cake rise uniformly. Do not skip this step, because small pockets of baking powder can create tunneling or bitterness.
- In a separate mixing bowl, beat the softened butter and granulated sugar with a hand mixer for 3 to 4 minutes until pale, light, and fluffy. Scrape the bowl once or twice so no dense butter remains at the bottom. Proper creaming incorporates air, which is especially important in a stovetop cake where heat is gentler than in an oven.
- Add the eggs one at a time, beating well after each addition until fully emulsified. If the mixture looks slightly curdled, add 1 tablespoon of the flour mixture and continue beating; this helps bring the batter back together. Mix in the lemon zest and lemon juice until just combined.
- Fold in half of the flour mixture with a spatula, then add the milk, then fold in the remaining flour mixture. Stir only until no dry streaks remain, because overmixing will toughen the crumb. The finished batter should be thick, smooth, and softly spoonable.
- Spoon the batter into the prepared pan and level the top with a small offset spatula or the back of a spoon. Tap the pan once or twice on the counter to release any large air pockets, but do not overdo it or you will deflate the batter. Place the pan over very low heat, preferably on a heat diffuser if you have one.
- Cover the pan tightly with the lid and cook for 30 to 35 minutes over very low heat. Resist lifting the lid for the first 20 minutes, as the trapped heat is needed for an even rise. You are looking for a cake that is domed, dry on top, and beginning to pull very slightly from the sides.
- Check for doneness by inserting a thin skewer into the center; it should come out clean or with a few moist crumbs, but no wet batter. If needed, continue cooking 3 to 5 minutes more on low heat, checking carefully so the base does not scorch. You may rotate the pan halfway through the final cooking time if your burner heats unevenly.
- Remove the pan from the heat and let the cake rest, covered, for 5 minutes so the residual heat finishes setting the center. Then uncover and cool in the pan for another 10 minutes. Running a thin knife around the edge before unmolding helps prevent tearing.
- Turn the cake out onto a rack, peel off the parchment, and let it cool completely before filling. Warm cake will melt the lemon curd and make the layers slide. If the top has a slight dome, level it gently with a serrated knife for a neater finish.
- Slice the cooled cake horizontally into 2 even layers using a long serrated knife. Spread 1/3 cup of the lemon curd over the bottom layer, stopping 1/4 inch from the edge so it does not squeeze out excessively. Set the top layer back in place and spread the remaining lemon curd over the surface.
- Finish by sifting the confectioners’ sugar lightly over the top just before serving. Let the assembled cake stand for 10 minutes so the curd settles and adheres cleanly to the crumb. Slice with a sharp knife wiped between cuts for the neatest presentation.
Notes
Store the cake covered in the refrigerator for up to 4 days because of the lemon curd topping. For best texture, let slices stand at room temperature for 20 to 30 minutes before serving. Freeze unfilled cake layers, well wrapped, for up to 2 months; thaw overnight in the refrigerator before filling. Reheating is not recommended once filled, but unfilled slices can be warmed in a 300°F / 149°C oven for 6 to 8 minutes.
Nutrition
- Calories: 472
- Sugar: 39.8g
- Sodium: 222mg
- Unsaturated Fat: 13.1g
- Carbohydrates: 64.3g
- Fiber: 0.9g
- Protein: 6.9g
- Cholesterol: 150mg
Keywords: Nigella lemon curd cake, stovetop lemon cake, lemon curd sponge cake, citrus cake, British style lemon cake, skillet cake